 Save to Pinterest
 My neighbor brought a pan of these to a block party last summer, and I couldn't stop thinking about them for weeks. The contrast between the fudgy red velvet base and the tangy cream cheese layer felt like the kind of dessert you'd find in a fancy bakery, not someone's home kitchen. I asked for the recipe on the spot, scribbled it on a napkin, and made my first batch the very next weekend. They didn't turn out quite as pretty as hers—my swirls looked more like anxious zigzags—but the taste was spot on. That's when I knew this recipe was going to be a keeper.
I made these for Valentine's Day one year when I wanted to surprise my family with something different from the usual cookies. The kitchen smelled like cocoa and vanilla while they baked, and my youngest kept peeking through the oven door, mesmerized by the swirls. When I finally cut into them after they'd chilled, the layers were so distinct and beautiful that everyone hesitated before taking a bite. It felt like one of those rare moments when a recipe actually lives up to the picture in your head.
Ingredients
- Unsalted butter: Melted butter creates that dense, fudgy texture that makes these brownies irresistible, and using unsalted lets you control the sweetness perfectly.
- Granulated sugar: This is what gives the brownie layer its slight crackly top and keeps the sweetness balanced against the tangy cheesecake.
- Eggs: Room temperature eggs blend more smoothly into both batters, preventing lumps and giving you a silkier finished texture.
- Vanilla extract: A little vanilla in both layers ties the flavors together and deepens the overall richness.
- Red food coloring: Gel works better than liquid for a vibrant color without thinning the batter, but either will do the job.
- All-purpose flour: Just enough to hold the brownies together without making them cakey, keep your measuring precise here.
- Unsweetened cocoa powder: This brings the chocolate flavor that makes red velvet more than just a colored cake.
- Cream cheese: Softened cream cheese is crucial, cold chunks will never blend smoothly no matter how long you mix.
Tired of Takeout? 🥡
Get 10 meals you can make faster than delivery arrives. Seriously.
One email. No spam. Unsubscribe anytime.
Instructions
- Get your pan ready:
- Preheat the oven to 175°C and line your pan with parchment, letting it hang over the edges like little handles. This trick makes lifting the brownies out so much easier when they're done.
- Mix the red velvet base:
- Whisk melted butter and sugar until it looks glossy, then beat in the eggs, vanilla, and food coloring until the batter turns a gorgeous deep red. Sift in your dry ingredients and fold just until you don't see streaks of flour anymore.
- Layer the batter:
- Scoop out a quarter cup of that red velvet batter and set it aside in a small bowl. Spread the rest evenly across the bottom of your pan, smoothing it gently with a spatula.
- Make the cheesecake topping:
- Beat your softened cream cheese until it's completely smooth with no lumps, then add sugar, egg, and vanilla. Mix until it looks like thick, creamy frosting.
- Create the swirl:
- Pour the cheesecake mixture over the brownie layer and spread it out gently. Drop spoonfuls of that reserved red velvet batter on top, then drag a knife through in swirls—don't overthink it, messy looks beautiful here.
- Bake until just set:
- Slide the pan into the oven for 35 minutes, checking that the center barely jiggles and a toothpick comes out with moist crumbs. Let them cool completely on a wire rack, then chill for at least two hours before slicing.
 Save to Pinterest
 The first time I served these at a potluck, someone asked if I'd ordered them from a bakery. I laughed and admitted the swirls were a happy accident from my shaky hand, but that compliment stuck with me. These brownies have this way of making ordinary moments feel a little more celebratory, whether it's a Tuesday night dessert or a holiday spread.
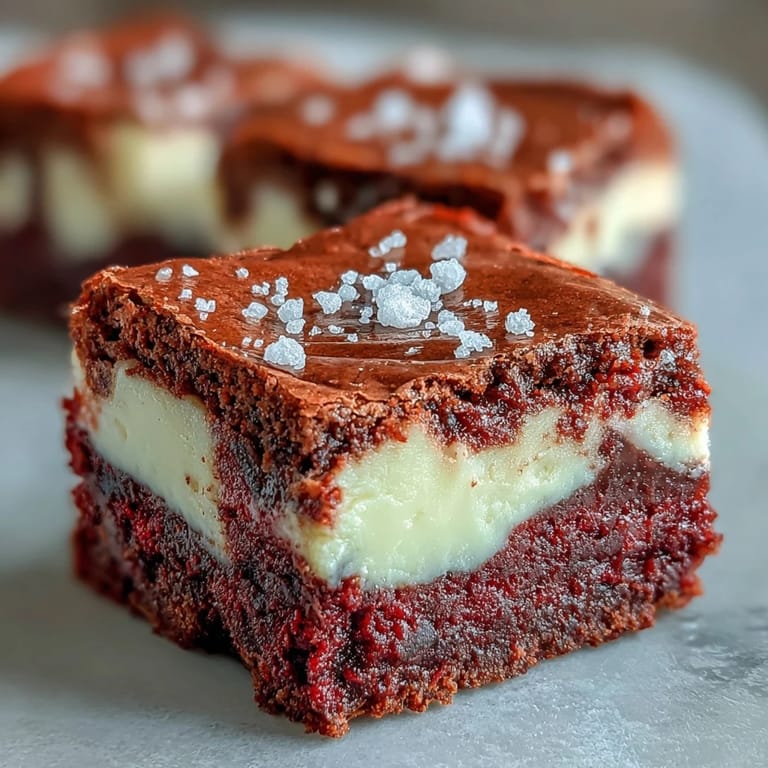
Getting the Perfect Swirl
The swirl is where these brownies go from good to stunning, but it doesn't require any special skill. I used to stress about making it look perfect, dragging my knife in careful patterns, until I realized the most beautiful swirls happened when I loosened up. Drop your reserved batter in random dollops, then pull your knife through in broad, confident strokes—zigzags, spirals, whatever feels natural. The contrast between the red and white will do the work for you, and no two pans ever look the same, which is part of the charm.
Storage and Make Ahead Magic
These brownies are one of the rare desserts that actually improve after a day or two in the fridge. The flavors meld together, the cheesecake layer firms up just enough to slice cleanly, and the whole thing tastes more cohesive. I always make them at least a day before I need them, wrapped tightly in the pan with plastic wrap. They'll keep for up to five days in an airtight container, though they've never lasted that long in my house. If you want to get really ahead, you can freeze them for up to a month—just thaw overnight in the fridge before serving.
Variations Worth Trying
Once you've made the basic version a few times, it's fun to experiment with little tweaks. I've stirred white chocolate chips into the brownie batter for extra richness, and I've swapped the vanilla extract in the cheesecake layer for almond extract when I wanted a slightly more complex flavor. A friend of mine tops hers with a cream cheese frosting after they've cooled, which feels almost excessive but tastes incredible. You can also bake these in a muffin tin for individual portions, just reduce the baking time to about 20 minutes and keep an eye on them.
- Sprinkle mini chocolate chips over the cheesecake layer before adding the swirl for pockets of melted chocolate.
- Add a teaspoon of espresso powder to the brownie batter to deepen the chocolate flavor without making it taste like coffee.
- Use a square cookie cutter to trim the edges and turn the scraps into a cook's treat while the pretty squares go on the serving plate.
 Save to Pinterest
 These brownies have become my go to whenever I want to bring something that feels special without spending all day in the kitchen. They're rich, beautiful, and always disappear fast—exactly what a good dessert should be.
Recipe FAQs
- → Can I use natural red food coloring instead of artificial?
Yes, you can use natural red food coloring, though the color may be less vibrant. Beet powder or natural gel colors work well, but you may need to adjust the quantity for desired color intensity.
- → How do I know when the brownies are perfectly baked?
The center should be just set with a slight jiggle, and a toothpick inserted should come out with a few moist crumbs—not wet batter. Overbaking will result in dry brownies rather than fudgy ones.
- → Can I make these ahead of time?
Absolutely! These brownies actually taste better after refrigerating overnight as the flavors meld together. Store them in an airtight container in the refrigerator for up to 5 days.
- → What's the best way to get clean cuts?
Refrigerate the brownies for at least 2 hours before cutting. Use a sharp knife wiped clean between each cut for neat, professional-looking squares.
- → Can I freeze these brownies?
Yes, these freeze beautifully! Wrap individual squares in plastic wrap, then store in a freezer-safe container for up to 3 months. Thaw in the refrigerator overnight before serving.
- → Why is my cheesecake layer lumpy?
Ensure your cream cheese is fully softened to room temperature before mixing. Beat it thoroughly until completely smooth before adding other ingredients to avoid lumps in the final product.