 Save to Pinterest
 My niece turned seven and announced she wanted a Betty Boop cake with a heart shape, red velvet, and a chocolate silhouette on top. I had never piped chocolate onto parchment before, but the image in her head was so specific I couldn't say no. The cake turned out lopsided, the silhouette cracked in two places, and she squealed so loud the neighbors came over to see what happened. That wobbly cake taught me more about baking with joy than any pristine layer ever could.
I baked this for a Valentine's brunch once, and my friend's toddler kept poking the chocolate Betty Boop until it finally snapped in half. Instead of panicking, we just stuck both pieces back on with extra frosting and called it abstract art. Everyone laughed, took photos, and the cake disappeared in under ten minutes. Sometimes the imperfect moments make the best stories.
Ingredients
- Cake flour: Sifting it twice makes the crumb impossibly soft and light, which is what sets this cake apart from dense box mixes.
- Natural unsweetened cocoa powder: Just enough to deepen the red color without making the cake taste like chocolate.
- Baking powder and baking soda: The soda reacts with vinegar to create tiny air pockets that give the cake its signature fluff.
- Fine sea salt: A small pinch balances the sweetness and makes every other flavor pop.
- Unsalted butter: Room temperature is non-negotiable, it creams with the sugar to trap air and build structure.
- Granulated sugar: Beats into the butter to create a light, fluffy base that holds the eggs and liquid.
- Large eggs: Room temperature eggs blend smoothly without curdling the batter.
- Buttermilk: Adds tang and moisture, and its acidity activates the baking soda for extra rise.
- Red gel food coloring: Gel won't water down your batter like liquid dye, and the color stays vivid after baking.
- Pure vanilla extract: Rounds out the flavor and makes the whole kitchen smell like a bakery.
- White vinegar: Reacts with baking soda to create lift and helps the red color stay bright.
- Cream cheese: The backbone of the frosting, it must be soft or it will clump and refuse to blend.
- Powdered sugar: Sift it or you'll end up with gritty frosting that no amount of beating will fix.
- Dark chocolate or candy melts: Melts smoothly for piping, and dark chocolate gives a bittersweet contrast to the sweet cake.
- Parchment paper: The silhouette peels off cleanly if you use parchment, wax paper will stick and tear.
Tired of Takeout? 🥡
Get 10 meals you can make faster than delivery arrives. Seriously.
One email. No spam. Unsubscribe anytime.
Instructions
- Prep the pans:
- Grease every corner of those heart pans and press parchment into the bottoms. I once skipped this step and spent twenty minutes prying cake shards out of the pan.
- Mix the dry ingredients:
- Whisk the flour, cocoa, baking powder, soda, and salt together in a bowl. Set it aside so you can focus on the creaming step without rushing.
- Cream butter and sugar:
- Beat the butter for a full minute until it lightens in color, then add sugar gradually. Keep beating for two to three minutes until the mixture looks fluffy and pale, this traps air that helps the cake rise.
- Add eggs one at a time:
- Crack each egg into the mixer on low speed, letting it blend before adding the next. Scrape the bowl sides between additions so nothing hides at the bottom.
- Color and flavor the batter:
- Stir in the red gel, vanilla, and vinegar until the batter turns a deep, even red. The vinegar smell fades completely in the oven.
- Alternate dry and wet:
- Add one-third of the flour mixture, then half the buttermilk, mixing on low just until you can't see streaks. Repeat with another third of flour, the rest of the buttermilk, then the last of the flour, stopping as soon as it's combined.
- Activate the baking soda:
- Mix vinegar and baking soda in a small cup, watch it foam, then fold it gently into the batter. This is the secret to that airy crumb.
- Divide and bake:
- Split the batter evenly between the pans, smooth the tops with a spatula, and bake for twenty-five to thirty minutes. A toothpick should come out clean or with just a crumb or two.
- Cool completely:
- Let the cakes rest in the pans for ten minutes, then turn them out onto racks. Frosting a warm cake will melt into a puddle, so wait until they're cool to the touch.
- Make the frosting:
- Beat the cream cheese and butter together until smooth, then add powdered sugar gradually on low speed. Finish with vanilla and a pinch of salt, beating until fluffy and spreadable.
- Level and layer:
- Trim any domed tops with a serrated knife if you want perfectly flat layers. Spread frosting on the first layer, top with the second, then chill for fifteen minutes to lock it in place.
- Apply the crumb coat:
- Spread a thin layer of frosting over the entire cake to trap any loose crumbs. Chill for ten minutes, then add a final smooth or swirled layer of frosting.
- Pipe the silhouette:
- Slip your stencil under parchment, pipe or brush melted chocolate over the outline, and let it set. I once tried to lift it too early and it bent like a Dali painting.
- Place the decoration:
- Peel the set chocolate carefully from the parchment and press it gently onto the center of the frosted cake. If it cracks, just patch it with a dab of melted chocolate.
- Final touches and chill:
- Add rosettes, edible glitter, or sugar pearls around the edges if you want extra flair. Chill the finished cake for thirty minutes so the frosting sets firm, then slice with a warm knife for clean edges.
 Save to Pinterest
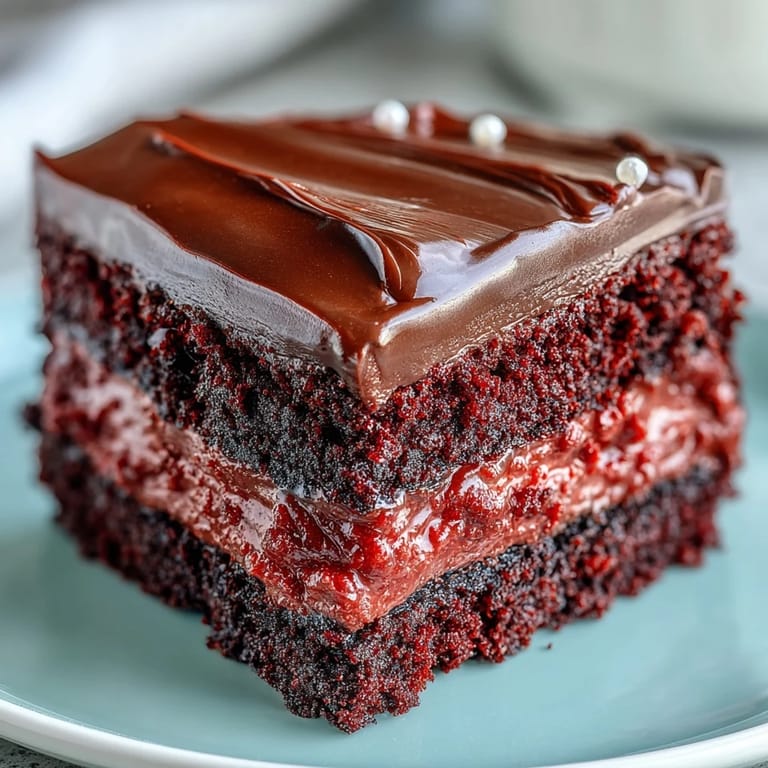
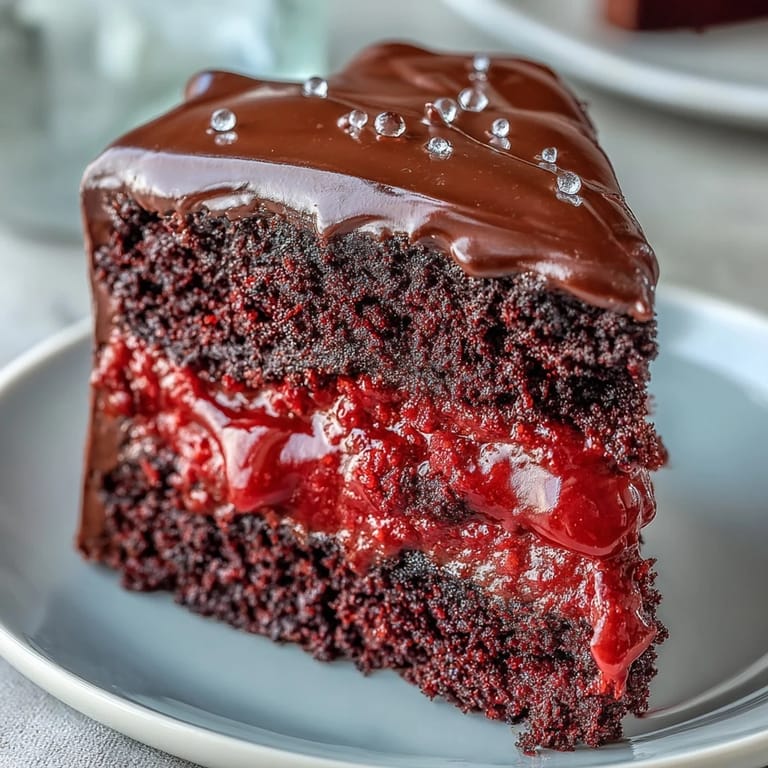
 The first time I served this cake, my cousin asked if I bought it from a bakery. I laughed so hard I almost dropped the cake server. That compliment felt better than any ribbon or blue star sticker ever could. Watching people take that first bite, seeing their eyes widen at the contrast of soft red cake and crisp chocolate, reminded me why I love baking for people I care about.
Choosing Your Chocolate
Dark chocolate gives you a bittersweet snap that balances the sweet frosting, but candy melts are easier to work with if you're nervous about tempering. I've used both, and honestly, the crowd doesn't notice the difference as long as the silhouette is crisp and shiny. If you want a starker contrast, try white chocolate dyed black with oil-based coloring, just make sure it's designed for chocolate or it will seize.
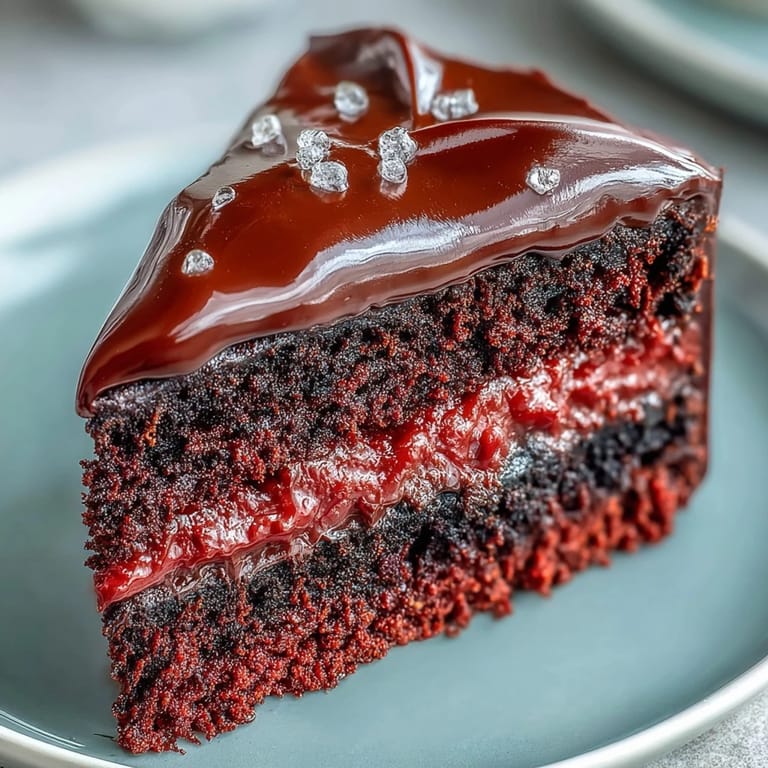
Getting the Color Right
I used to add food coloring until the batter looked bright red, then it would bake into a sad brownish pink. The trick is to go one shade darker than you think you need, because the oven dulls the vibrancy. Gel coloring is your friend here, liquid dye thins the batter and the color never holds. If your batter looks almost burgundy before baking, you're on the right track.
Storage and Make-Ahead Tips
This cake keeps beautifully in the fridge for up to four days, covered loosely so the frosting doesn't dry out. You can bake the layers a day ahead, wrap them tightly in plastic, and frost them the next day for less stress. The chocolate silhouette can be made a week in advance and stored in an airtight container at room temperature, just handle it gently because it's delicate.
- Let the cake sit at room temperature for twenty minutes before serving so the frosting softens.
- Freeze unfrosted layers for up to two months, wrapped tightly in plastic and foil.
- Warm your knife under hot water and wipe it dry between slices for clean, neat cuts.
 Save to Pinterest
 Every time I make this cake, someone asks for the recipe, and I hand it over knowing they'll add their own twist. Maybe your Betty Boop will be perfect, maybe she'll crack and you'll patch her with frosting and laugh about it later, either way, you made something with your hands that brought people together.
Recipe FAQs
- → What gives the red layers their tender texture?
The buttermilk and vinegar-baking soda reaction creates exceptionally tender crumbs with a light, airy structure that stays moist.
- → Can I make the chocolate silhouette ahead?
Yes, prepare silhouettes up to a week in advance. Store between parchment sheets in an airtight container at room temperature.
- → Why use gel food coloring instead of liquid?
Gel coloring delivers intense red pigment without thinning the batter, ensuring the proper texture and rise.
- → How should I store leftovers?
Cover and refrigerate for up to four days. The tangy frosting and moist crumb hold beautifully when chilled.
- → What makes the cream cheese frosting tangy?
Real cream cheese naturally provides tanginess, perfectly complementing the sweet red layers and rich chocolate.