 Save to Pinterest
 My neighbor's daughter turned seven, and her mom asked if I could make something special—something that would make her gasp when she walked into the kitchen. Betty Boop immediately came to mind; I could still picture those glossy red lips and perfectly coiffed black hair from the old cartoons my own parents used to watch. The challenge wasn't just baking a good cake, it was capturing that playful cartoon energy in buttercream and fondant, turning sugar into pure nostalgia wrapped in cream cheese frosting.
When I unveiled that Betty Boop cake at the birthday party, the whole room went quiet for a beat—then that little girl absolutely lost it. Her eyes went wide, she laughed this delighted laugh, and suddenly every kid wanted to know if Betty was going to come to their birthday too. That's when I realized this cake isn't just dessert; it's a conversation starter, a memory maker, and proof that taking time to make something look magical actually changes how people experience it.
Ingredients
- All-purpose flour (2 cups): Sift it before measuring if you want an extra-tender crumb; I learned this the hard way after one cake came out dense.
- Granulated sugar (1 ½ cups): This is your foundation for moisture and structure, so don't skimp or substitute brown sugar here.
- Baking powder (2 teaspoons): Check the expiration date—old leavening is the silent killer of otherwise perfect cakes.
- Salt (½ teaspoon): Tiny but essential; it balances sweetness and brings out the vanilla.
- Unsalted butter (½ cup plus ½ cup more): Room temperature is non-negotiable—cold butter won't cream properly and you'll end up with a dense cake.
- Large eggs (2): Room temperature eggs incorporate better and create a more uniform batter.
- Whole milk (¾ cup): The buttermilk adds slight tang, but whole milk works beautifully here.
- Vanilla extract (2 teaspoons): Use real vanilla; the artificial stuff tastes tinny against the red velvet flavor.
- Red gel food coloring (1 tablespoon): Gel coloring won't thin your batter like liquid dyes do, and it delivers that jewel-tone red Betty Boop is famous for.
- Cream cheese (8 ounces): Cold cream cheese is harder to blend; let it sit out on the counter while your cakes cool.
- Powdered sugar (4 cups): Sift it to avoid lumps that will show up as grit in your frosting.
- Black fondant (8 ounces): This forms Betty's signature hair; you can buy it premade or color white fondant yourself if you're feeling adventurous.
- White fondant (4 ounces): For eyes and highlights; fondant is forgiving to work with once you understand it doesn't like sticky hands.
- Red fondant (2 ounces): A small amount goes a long way for those iconic lips.
Tired of Takeout? 🥡
Get 10 meals you can make faster than delivery arrives. Seriously.
One email. No spam. Unsubscribe anytime.
Instructions
- Get Everything Ready:
- Preheat your oven to 350°F and line two 8-inch pans with parchment paper—this step saves heartbreak when you're trying to flip out delicate cakes. Pull your eggs, milk, and butter out of the fridge now so they reach room temperature by the time you need them.
- Mix Your Dry Ingredients:
- Whisk flour, baking powder, and salt together in a medium bowl, then set it aside. This small act of preparation prevents overmixing later and keeps your cake tender.
- Cream Butter and Sugar:
- In a large bowl, beat softened butter and granulated sugar on medium speed for about 3 minutes until it looks pale and fluffy like clouds. This step is where the magic starts—you're aerating the mixture so the cake will be light and tender.
- Add Eggs One by One:
- Drop in one egg, beat until combined, then repeat with the second egg. Don't rush this; beating properly ensures the eggs emulsify into the butter mixture instead of sitting on top looking curdled.
- Stir in the Flavor:
- Add vanilla extract and mix until you can smell that warm vanilla throughout the bowl.
- Alternate Wet and Dry:
- Switch your mixer to low speed and add flour, milk, flour, milk, flour in three alternating additions, starting and ending with flour. This method prevents overmixing, which is the enemy of tender cake; you'll feel the difference the moment you bite into it.
- Bring in the Red:
- Add red gel food coloring a few drops at a time, mixing until the batter is that deep, gorgeous red that stops people in their tracks. Go a little darker than you think you need—the color will appear lighter once baked.
- Divide and Bake:
- Pour batter evenly into both pans, smooth the tops with a spatula, and slide them into the oven for 25 to 30 minutes. Rotate the pans halfway through so they bake evenly; I usually set a phone timer so I don't forget.
- Cool with Patience:
- Let cakes rest in the pans for exactly 10 minutes—not less, or they'll crumble; not more, or they'll stick—then invert onto wire racks. They need to cool completely before frosting, so use this time to make the buttercream.
- Make the Cream Cheese Buttercream:
- Beat softened cream cheese and butter together until smooth, about 2 minutes, then gradually add powdered sugar one cup at a time on low speed. Once it's incorporated, crank up to medium and beat for 3 more minutes until it's light, fluffy, and spreadable.
- Level and Layer:
- Once cakes are completely cool, use a serrated knife to trim off the domed tops so they're flat and stackable. Place one layer on your cake board, spread frosting on top, then carefully set the second layer on top.
- Apply the Crumb Coat:
- Spread a thin layer of buttercream all over the cake—this traps any crumbs so your final coat looks pristine. Chill in the refrigerator for 20 minutes until the frosting sets up.
- Final Frosting:
- Apply your final coat of buttercream and smooth it with an offset spatula or cake scraper, getting it as even as you like. This is where patience pays off; the smoother you make it, the better your fondant decorations will stick.
- Prepare Black Hair:
- Dust a clean work surface lightly with cornstarch, then roll out black fondant to about 1/8-inch thickness. Cut out Betty's hair silhouette using a template or freehand—I printed a picture from Google and used it as a guide, then carefully transferred the fondant onto parchment paper.
- Make Eyes and Details:
- Roll white fondant and cut out two large circles for eyes and small heart shapes for eye highlights; roll red fondant and cut out lips. Dust with edible pearl dust if you want them to shimmer like Betty's.
- Attach the Face:
- Once the cake is chilled and frosting is firm, gently drape the black fondant hair over the front of the cake, trimming excess at the base with a small knife. Use tiny dabs of buttercream to glue on white eyes, red lips, and fondant eyelashes and eyebrows.
- Optional Headband:
- Roll a thin coil of red fondant into a decorative headband and place it across the top edge of the hair silhouette for that authentic Betty Boop look. Add final touches like sugar flowers or edible sparkles around the base if you're feeling fancy.
- Rest Before Serving:
- Let the finished cake sit at room temperature for 30 minutes before slicing so the fondant sets completely and the layers come together more cleanly.
 Save to Pinterest
 The best part about this cake isn't the baking or even the decorating—it's the moment when you know you've made something that's going to be remembered. Years later, that little girl will probably still mention Betty Boop and her seventh birthday cake, and that's the real magic we're chasing in the kitchen.
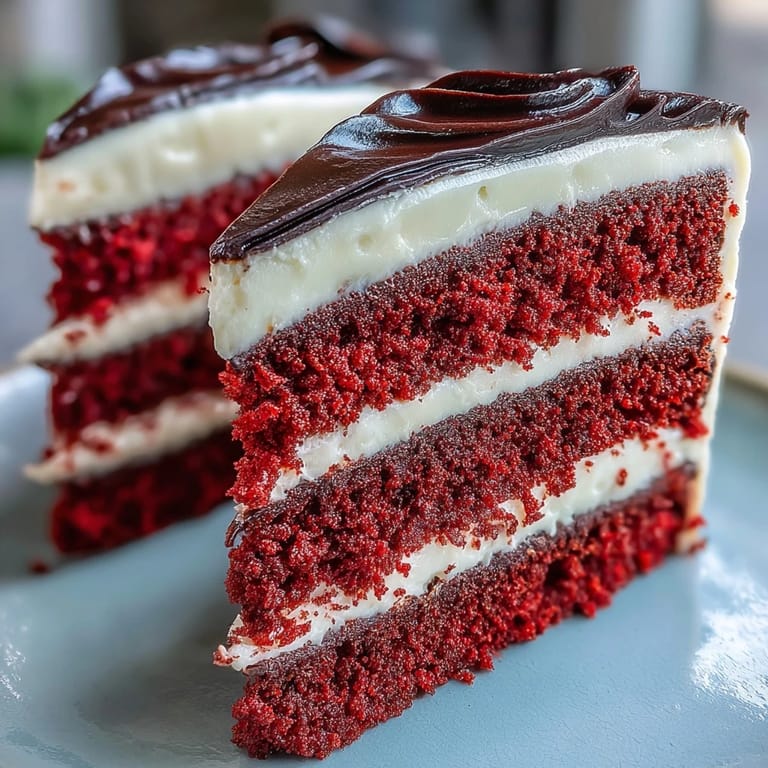
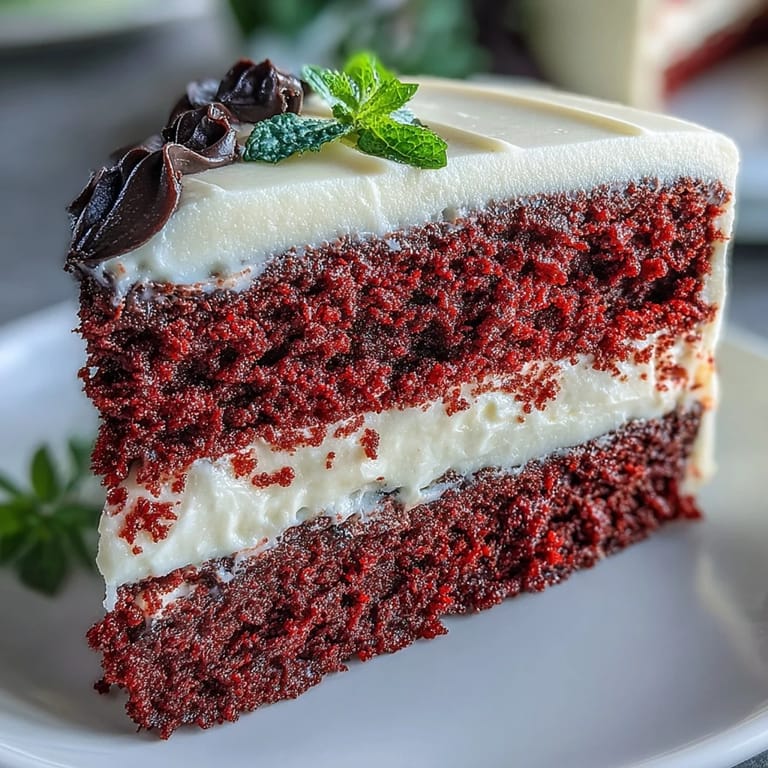
When Red Velvet Meets Cartoon Charm
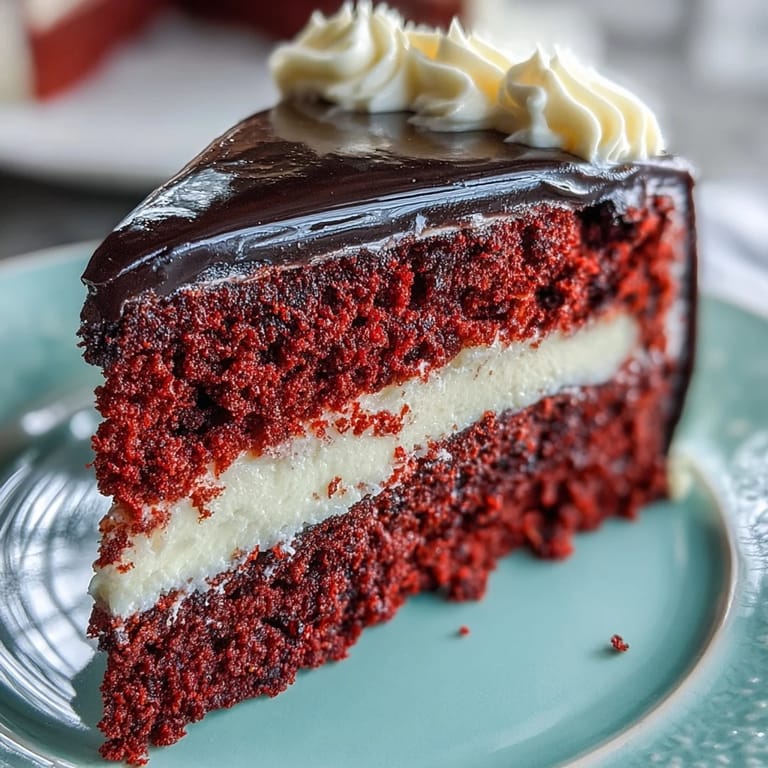
Red velvet cake has this special quality where it tastes slightly different from regular vanilla or chocolate—there's a subtle tang and earthiness from the cocoa that gives it depth. For this Betty Boop version, that flavor profile actually makes sense; it's whimsical enough to match the playful character, but the cake itself is elegant enough that adults genuinely want to eat it, not just admire it. The cream cheese buttercream ties everything together because its tanginess echoes the red velvet's undertones.
Fondant Sculpting Tips That Actually Work
I was intimidated by fondant for years until I realized it's basically colored sugar dough that forgives almost everything. The key is keeping your hands dry, working on a cornstarch-dusted surface, and understanding that fondant softens with body heat—so if it gets sticky, just refrigerate it for 10 minutes and try again. One secret I discovered is that white fondant takes food coloring better than pre-colored fondant, so if you want precise colors, start with white and color it yourself using gel paste.
Making This Cake Your Own
This recipe is sturdy enough to handle variations without falling apart, which means you can make Betty Boop exactly as you imagine her. Some bakers add 1 teaspoon of cocoa powder and 1 teaspoon of white vinegar to deepen that classic red velvet flavor, while others swap the cream cheese buttercream for Swiss meringue buttercream if they want something lighter and less tangy. Fondant decorations can be made a full day ahead and stored in an airtight container at room temperature, so you can spread the work across two days and feel way less stressed about it.
- If you're nervous about fondant, practice on a small test cake first—it's an easy skill once you get the hang of it.
- Wooden dowels inserted through both cake layers add serious stability, especially if this cake is traveling to a party or sitting around all day.
- Serve slices with fresh berries or whipped cream to balance the richness and add a pop of color that makes the presentation even more striking.
 Save to Pinterest
 This Betty Boop cake is proof that baking isn't just about feeding people—it's about creating moments they'll carry with them. Take your time, trust the process, and remember that the slightly imperfect details are what make it memorable.
Recipe FAQs
- → How far in advance can I make the fondant decorations?
Prepare all fondant elements up to one day before assembly. Store in an airtight container at room temperature, keeping pieces separated with parchment paper to prevent sticking.
- → Can I use store-bought fondant instead of making my own?
Absolutely. Store-bought fondant works beautifully for this design. Knead it briefly until pliable before rolling, and dust your work surface with cornstarch rather than powdered sugar to prevent sticking.
- → What's the best way to achieve deep red color?
Use high-quality gel food coloring rather than liquid. Start with one tablespoon and add more as needed. Gel colors provide vibrant shades without thinning the batter or affecting texture.
- → Do I need dowels for stability?
For two layers, dowels aren't essential but can provide extra insurance. Insert one or two wooden dowels through the center before final frosting if transporting the cake or displaying in warm conditions.
- → How should I store the completed cake?
Keep refrigerated due to the cream cheese frosting. Cover loosely with a cake dome or plastic wrap to prevent the fondant from becoming sticky. Bring to room temperature 30 minutes before serving for optimal texture.